
Usually I like to write up on my blog the things that go well. Today, I’ll write about a mistake–one that meant my latest iTeadStudio PCB order was totally wasted. Sad for me, but hopefully you can learn from it!
The Problem: Air Wires

Like many people, I do my layout in Eagle, and I use the autorouter. Some folks dis the autorouter, but I find it quite useful, as long as you change the layout grid down to 10 mils. The big problem is that if the routing fails, it doesn’t tell you about it. Worse still, running a DRC pass doesn’t flag it as an error! It just leaves some un-routed connections as ‘air wires’. See the small inconspicuous yellow lines going straight between some pads? Of course, air doesn’t conduct electronic signals very well, so you can send off a set of boards this way, wait a month, and realize you’re out of luck,
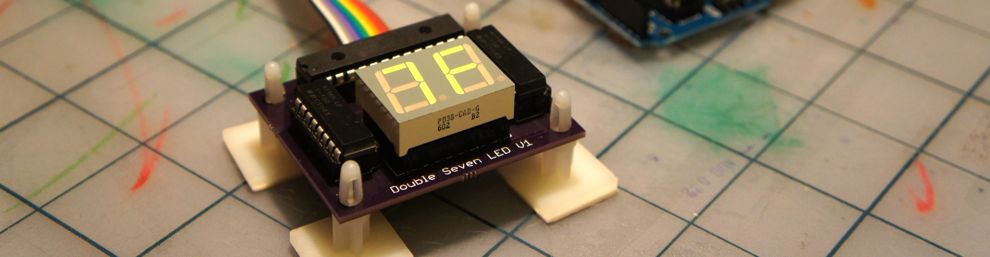
The problem here was those extra holes under the IC socket. This is the footprint of my battery pack. The holes keep the autorouter from running wires there, and there’s no where else for them to go. So the autorouter fails. Sadly, those holes are actually useless, because screws won’t really fit under the IC socket. The only hole which will be populated with a screw is the hole that’s just off the end. The solution was simple: Just remove the two extra holes and re-route. And send off to iTeadStudio again (sigh).
Eagle definitely should flag air wires as errors during DRC!!
The Solution: Greenwire

Before just ordering a new set of boards, I still wanted to double-check that there isn’t some OTHER mistake on this board, so it’s necessary to build it out totally working and bring it up properly. The solution? Greenwire!!
A ‘green wire’ is essentially a ‘patch’ for your hardware, also known as a ‘blue wire’ in some cultures. This time around, FOUR such wires are needed. To figure out how to do this, I made a map, exporting the board to a PNG file and drawing the wires by hand in GIMP. This was especially important because it’s important to have no overlapping wires. When the unit is attached to a battery pack, overlapping wires will cause an uneven (and ugly) mounting.
This turned out so well that I actually built a handful of these units even with the green wires. It doubles the amount of time needed to assemble the unit, but it does mean not waiting another month (or more) to get the next spin of the PCBs.

I can not tell you how many of my boards I have done that required this treatment. And for what its worth both of the production versions of my current clients boards have at least this much work on them. Nice Work!
This is also a good trick if you etch your own board and some of the traces don’t come out right, or If you just can’t quite get a layout down to 1 sided for making at home.
Always run this before generating gerbers 🙂
ftp://ftp.cadsoft.de/eagle/userfiles/ulp/zoom-unrouted.ulp
Thanks for the tip!
I’ve been burned by Eagle’s “silent failure” of the autoroute functionality until I noticed the display in the lower left corner of the Eagle window. When you do an auto route, the display will show a percentage, indicating how much of the board was able to be routed. Since noticing that subtle feature, I haven’t had any bad boards due to un routed air wires.
Great tip, thanks! Yes, I’ve now trained myself to look there too. Would be nice if they would be more clear about the error!!
There is a better (harder) method and that is to print the netlist and check off every line on the schematic (verifies junctions) and then when the board is routed do the same thing again.
I am aware of the Autorouter’s status box, It’s there on all autorouters I have used But If you are as I was, in the habit of copying standard parts of schematics like voltage regulators/power supplies it’s possible to get a wire that doesn’t connect with a pin (I know it can be seen) or a junction that doesn’t “Stick” to both wires, you have a potential problem that might or might not get caught by the schematic ERC. That’s the start because it gives one a false sense of security that your schematic and board are OK.
The final check against the schematic just requires that you mark off each wire on the schematic with a highlighter…
It unfortunately took me many years to get it through my head that it isn’t checked until it’s checked and then I didn’t need to look for “That Right Shade of green” anymore
Doc
I know this is an old post, but …
Air wires are located in layer 19, so to check for any air wires just turn off all layers except 19.
Any left over air wires are easily noticed. This is useful even when you route manually.
Thanks for the tip! Good to know.